C6 Bike Assembly Video
Video Transcript:
BowFlex C6 Bike Assembly Video
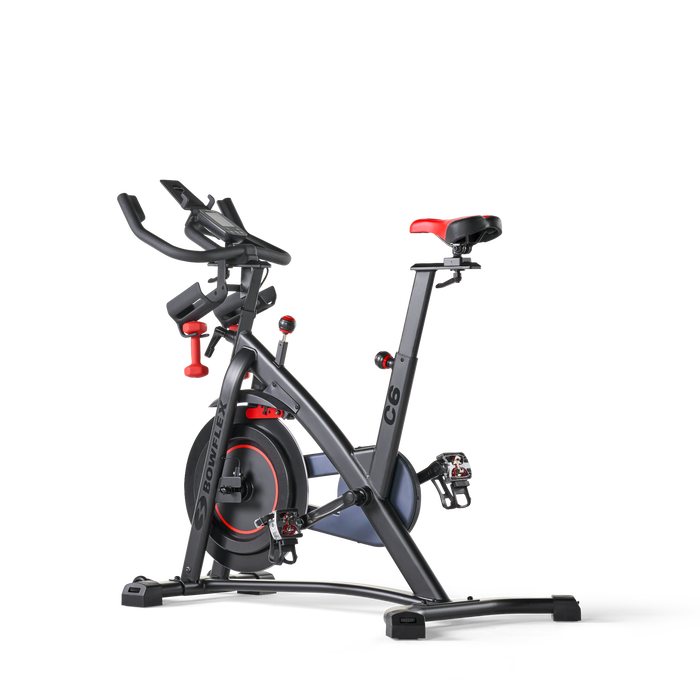
In this video we will show you how to assemble the C6 bike.
Begin by selecting an area where you are going to set up and operate your bike.
For a safe operation the machine must be located on a heart level surface. Please allow a minimum work area of 24 inches around the perimeter of the bike.
Be sure that the workout space you chose has adequate high clearance; taking into consideration the height of the user and maximum incline of the fitness bike.
Before you begin the assembly please make sure to read the assembly manual thoroughly as it contains the important safety warnings and assembly tips.
Please note that there are some steps in the assembly process that might require two people to help with the assembly.
Some components of the machine can be heavy or unwieldy. Please use a second person when doing assembly involving these parts.
Start the assembly by checking the parts list.
The following parts are included with your assembly.
Please note that a right R and left L decal has been applied to some parts to assist with assembly.
- Item 1: Console (x1)
- Item 2: Handlebar Post (x1)
- Item 3: Seat (x2)
- Item 4: Seat Post (x1)
- Item 5: Pedal, Left (x1)
- Item 6: Rear Stabilizer (x1)
- Item 7: Frame (x1)
- Item 8: Stabilizer, Front (x1)
- Item 9: AC Adapter (x1)
- Item 10: Water Bottle Holder (x2)
- Item 11: Pedal, right (x1)
- Item 12: Water Bottle Bracket (x1)
- Item 13: Handlebar (x1)
- Item 14: Media Tray (x1)
- Item A: Adjustment Handle, Handlebar/Seat (x2)
- Item B: Flat Washer, M10 Wide (x2)
- Item C: Adjustment Handle, Handlebar/Post (x1)
The following wrenches are included with your assembly:
- A three millimeter and six millimeter allen wrench; as well as
- a number two phillips screwdriver with a 13 millimeter, 14 millimeter, and 15 millimeter wrench head.
Step One, Attaching the Stabilizers to the Frame Assembling
For this step you will require the following parts:
- Item 6: Stabilizer, Rear (x1)
- Item 7: Frame (x1)
- Item 8: Stabilizer, Front (x1)
- 6mm Wrench
You might require two people to help with the assembly process in this step.
The hardware in this step is pre-installed and not included in the hardware bag.
If shipping material or a tube is pre-installed in the stabilizer bracket remove and set it safely aside.
Begin step 1 by having a second person assist you lifting the frame.
Next locate the rear and front stabilizers (part six and eight) and align the stabilizers to the locations shown.
Slowly push the frame assembly on top of the stabilizers and match the top holes as shown.
Place the hardware on the following locations.
Each set of hardware used to secure the stabilizers include a bolt and two washers the hardware might need to be removed prior to installation of the frame.
Next insert the bolts through the frame and tighten the bolts using the provided six millimeter allen wrench. Take care not to over tighten the bolts.
Repeat these steps for the opposite side.
Make sure to tighten all hardware.
After all hardware has been tightly secured step one is now complete.
Step Two, Attaching the Pedals to the Frame Assembly
For this step you will require the following parts:
- Item 5: Pedal, Left (x1)
- Item 11: Pedal, Right (x1)
- Screwdriver Wrench (x1)
Begin step 2 by locating the left and right pedals; parts eleven and five.
The left pedal is reverse threaded.
Be sure to attach pedals on the proper side of the bike.
Orientation is based from a seated position on the bike the left pedal has an L decal and the right pedal an R decal.
Line up the pedals to the appropriate locations as shown.
Push the foot pedals and align the threaded ends of the pedals with the hole of the frame pedal bar.
To tighten the left pedal use the provided wrench tool place it on the nut towards the threaded end of the pedal and tighten the pedal counterclockwise.
Repeat these steps for the opposite side.
To tighten the right foot pedal use the wrench tool and tighten the pedal clockwise.
After both pedals are tightly secured step two is now complete.
Step Three, Attaching the Handlebar Post and Seat Post
For this step you will require the following parts:
- Item 2: Handlebar Post (x1)
- Item 3: Seat
- Item 4: Seat Post (x1)
- Item A: Adjustment Handle, Handlebar/Seat (x1)
- Item B: Flat Washer, M10 Wide (x1)
- Item C: Adjustment Handle, Handlebar/Post (x1)
Begin step three by locating the handlebar post (part 2).
Place the handlebar post on top of the front frame hole and slowly slide it into place.
Next secure the handlebar post to the frame assembly using the adjustment handle (part C).
When fully tightened the handle must point downward.
Tighten the handle as needed and make sure the handlebar post adjustment handle engages the holes in the handlebar post.
To attach the seat post rotate and pull the seat post adjustment knob so it's clear of movement.
Next insert the seat post in the dedicated location and make sure the handlebar post adjustment knob engages the holes in the handlebar post.
Attach the seat post to the desired height as needed.
Finally place the seat (part 3) on top of the seat post as shown.
To secure the seat place the Part B washer underneath the seat post and use the part a handle bar adjustment handle to attach the seat.
Adjust the seat as needed and fully tighten the handle.
Step Three is now complete
Step Four, Installing the Handlebar to the Frame Assembly
For this step you will require the following parts:
- Item 13: Handlebar (x1)
- Item B: Flat Washer, M10 Wide (x1)
- Item C: Adjustment Handle, Handlebar/Post (x1)
Begin step four by locating the handle bar, part number 13.
Line up the handlebar to the front section of the frame and make sure the adjustment handle engages the holes in the handlebar post.
Next secure the handlebar to the frame assembly using the adjustment handle and washer, parts a and B.
Place the Part D washer underneath the seat post and use the handle bar adjustment handle to attach the handlebar. Adjust the handlebar as needed and fully tighten the handle.
When fully tightened the handle bar adjustment handle must point forward.
Step Four is now complete.
Step Five, Attaching the Water Bottle Brackets and Holders
For this step you will require the following parts:
- Item 12: Water Bottle Bracket (x1)
- 3mm Allen Wrench (x1)
- Item 10: Water Bottle Holder (x2)
Begin step 5 by attaching the water bottle bracket part 12 onto the handlebar post.
The hardware in this step is pre-installed and not included in the hardware bag.
The bolts used might need to first be removed from the handlebar post.
Secure the water bottle bracket to the frame assembly using these four bolts. Tighten the bolts using the provided Phillips screwdriver.
Next place one of the water bottle holders (part 10) onto the side of the water bottle holder. Match the holes on the bracket and secure the holder using two bolts. These two bolts come pre-installed and might need to first be removed from the holders. Tighten the bolts using the provided three millimeter allen wrench.
Finally repeat these steps for the opposite side.
Step Five is now complete.
Step Six, Attaching the Console to the Frame Assembly
For this step you will require the following parts:
- Phillips Screwdriver #2
- Item 1: Console (x1)
Begin step 6 by locating the console part 1. Turn the console over and remove the four pre-installed screws using the provided Philips screwdriver. Remove the four screws and set them aside for now.
Next place the console on top of the water bottle bracket and try not to crimp the cable as you set the console.
Secure the console using the four previously removed screws and tighten the screws using the provided Philips screwdriver.
Next locate the cable coming out of the frame and connect the console cable to it. simply push and connect the cables together.
Step Six is now complete
Step Seven, Attaching the Media Tray
For this step you will require the following parts:
- Item 14: Media Tray (x1)
- Phillips Screwdriver #2
Begin step seven by placing the media tray (part 14) onto the handle bar. Secure the media tray using three screws. The hardware in this step is pre-installed and not included in the hardware bag. The screws used might need to first be removed from the handlebar. Tighten the screws using the provided Phillips screwdriver.
After all hardware has been tightly secured step seven is now complete.
Step Eight, Connecting the AC Power Adapter
Begin step eight by placing the AC adapter (part number nine) to the front near the bottom of the frame assembly. Next plug the power adapter as shown.
Push the AC adapter into location and make sure that the power adapter wire stays clear of all moving parts.
Congratulations! You have now completed the assembly.
Before using the machine, please make a final inspection.
You can now remove any protective covers from the face of the console. Please inspect the machine to ensure that all fasteners are tight and components are properly assembled.Do not use until the machine has been fully assembled and inspected for correct performance in accordance with the owner's manual
C6 Bike Operating and Key Features
After assembling your new C6 bike we will now show you how to move and level your machine as well as some of the key features.
Moving the machine is simple. The fully assembled machine can be moved by one or more persons. Before moving the bike, remove the dumbbells, any media devices, or water bottles from the bike. In addition it is recommended you tighten the emergency brake resistance adjustment knob until the fly wheels are locked before moving the bike.
To lock the flywheel turn the resistance adjustment knob clockwise until it encounters an increase in resistance, then rotate the knob another half turn clockwise.
To move the bike carefully pull the handlebars toward you while pushing the front of the bike downward. Push the bike to the desired location.
Be careful when you move the machine abrupt motions can affect the computer operation.
Once the machine has been moved to your new location you might want to level the machine if the floor on your workout area is uneven. To adjust and level your bike adjust the leveler is located on each side of the stabilizers. Lift the stabilizer slightly to take the weight off the adjuster then turn the knob to adjust the stabilizer foot up and down. Do not adjust the levers to such a height that they detach or unscrew from the machine.
You may place media and dumbbells back after adjusting the bike.
Changing and adjusting the bike to your height needs is easy. To adjust the seat post release the seat post adjustment knob. Adjust the seat post up and down as needed, but do not lift the seat post above the stop mark on the seat post. Make sure that the pin is fully engaged and fully tighten the adjustment knob.
To move the seat closer to or away from the console, loosen the seat slider adjustment handle. To loosen the adjustment handles grab and pull the handle out. While the handle is out the seat would be allowed to move.
Move and slide the seat to the desired position and fully tighten the handle. To fully tighten the adjustment handle push it back into place, then turn it clockwise, then pull it out again and repeat this process until the handle is fully tightened.
Next when operating the bike and you wish to stop the pedals immediately, push down hard on the emergency brake resistance adjustment knob as shown.
Finally to adjust the handlebar position, loosen the handlebar post adjustment handle on the handlebar post and adjust the handlebar up and down to the desired height.
Do not crimp the cables and be sure to fully tighten the adjustment handle. When fully tightened the handle bar adjustment handle must point forward.
To move the handlebar closer to or away from the seat, loosen the handlebar slider adjustment handle. Slide the handlebar front and back to the desired position and fully tighten the handle.
Your new C6 fitness bike comes equipped with many features. The console display shows the workout measurements and current options. Please reference the assembly manual for workouts troubleshooting and other program features.
Enjoy your new C6 bike. Brought to you by BowFlex.
